This is Part VI of a series of tutorials on PEBL
One of the hidden and powerful capabilities of PEBL is its ability to draw shapes. Many times, if you want to create some geometric shape as a stimulus, it is fine to do so in a image editing program such as photoshop, and then import the rasterized image into PEBL. But you can usually save yourself a lot of hassle by creating them in PEBL itself. Furthermore, if you have a set of shapes that differ in some systematic way (size, orientation, length, color), you can create these on-the-fly to suit the experimental condition.
The main shapes available in PEBL are the circle, square, rectangle, ellipse, line, polygon, and Bezier curve. The polygon lets you specify almost arbitrarily complex polygons, and so there really is a lot of flexibility. A number of helper functions exist that create polygons in useful shapes, such as Thickline, Star, plus, BlockE, etc. Many of the graphics capabilities of PEBL are exercised in demo/graphics.pbl.
To start, let's try a circle. Circles have five parameters: x,y, radius, color, and a flag to indicate whether or not it should be filled. A simple example program, which produces the screen on the right:
define Start(p)
{
win <- MakeWindow()
circ <- Circle(200,200,190,
MakeColor("red"),1)
AddObject(circ,win)
Draw()
WaitForAnyKeyPress()
}
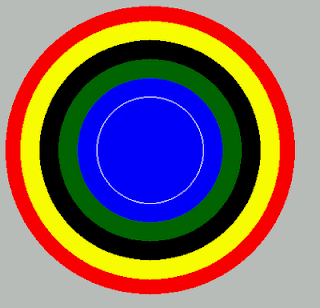
This is pretty simple, so let's add some other shapes. We'll start by adding a few smaller circles. We'll do it semi-randomly. First, I'll create a list of colors which I'll shuffle, then iterate through each color, creating a circle at the same location and adding to the window. On each iteration, I'll make the radius 20 pixels smaller, and for fun choose randomly whether the circle will be an outline or filled circle.
 define Start(p)
{
win <- MakeWindow()
circ <- Circle(200,200,190,
MakeColor("red"),1)
AddObject(circ,win)
#Create a shuffled list of colors
colors <- Shuffle(["darkgreen","blue",
"black","white","yellow"])
tmp <- []
r <- 170
loop(col,colors)
{
c <- Circle(200,200,r,
MakeColor(col),Random()<.5)
AddObject(c,win)
tmp <- Append(tmp,c)
r <- r - 25
}
Draw()
WaitForAnyKeyPress()
}
Now, to stretch out a little, I've added three additional shape areas. On the upper right, I create dan orange square with a black outline, by overlaying an unfilled square over a filled square. On the lower left, I created a filled ellipse. On the lower right, a series of lines that fan out from their tarting point by changing the 'width' parameter from negative to positive. The code is here:
{
win <- MakeWindow()
background <- Rectangle(gVideoWidth/2,gVideoHeight/2,
gVideoWidth-20,gVideoHeight-20,
MakeColor("darkgrey"),1)
AddObject(background,win)
circ <- Circle(200,200,190,MakeColor("red"),1)
AddObject(circ,win)
colors <- Shuffle(["darkgreen","blue","black","white","yellow"])
tmp <- []
r <- 170
loop(col,colors)
{
c <- Circle(200,200,r,MakeColor(col),Random()<.5)
AddObject(c,win)
tmp <- Append(tmp,c)
r <- r - 25
}
##Make a square with an outline
square <- Square(600,200,125,MakeColor("orange"),1)
outline <- Square(600,200,125,MakeColor("black"),0)
AddObject(square,win)
AddObject(outline,win)
ellipse <- Ellipse(200,500,130,60, MakeColor("darkgreen"),1)
AddObject(ellipse,win)
##Build a fan effect
i <- 1
while (i < 20)
{
line <- Line(600, 400,-80+i*14,70,MakeColor("black"))
AddObject(line,win)
tmp <- Append(tmp,line)
i <- i + 1
}
Draw()
WaitForAnyKeyPress()
}
The upper left is the random bullseye coded above. Upper right is an orange square, with a black-edged unfilled square of the same size at the same location. That creates a border and makes it stand out a bit better. At the bottom left is a green ellipse, and the bottom right is a series of lines, each with the same starting location, and with end locations which each differ by ten pixels.


No comments:
Post a Comment